Introduction
Testing JavaScript code - or testing in general - is a hot topic of which a lot of developers shy away from.
You shouldn't!
It was also intimidating to me in the past but it turns out: With modern tooling, testing isn't that hard and it's definitely time to get started!
In this article and the above video, we'll dive into what testing is all about, why you would want to test and which kinds of tests you have. Of course we'll do all that by simply writing some tests!
Note: Don't want to read? Watch the video which you find above the article, at the top of the page!
What Is Testing?
So what is testing after all? Don't we test all the time when we just click around in our app?
Well, this is testing, you are right. But it's manual testing. We test by clicking around.
To some extent, this is a good thing to do. Actually, you will always be doing that because you want to experience your app on your own.
But writing automated tests - and that is what this article is mainly about - speeds up your development flow and gives you a way of quickly identifying issues, breaking changes and side effects.
If you got a bunch of automated tests, you can quickly spot problems when you start working on your code and suddenly one or more of your tests fail.
Automated tests, by the way, are really just code snippets that run your code and then check if the result of that code execution meets a certain expectation. But you'll see all that below.
So to sum it up, "testing" here really just means: Writing automated tests (i.e. code that runs your code) and defining expectations these tests/ code executions should meet.
Why Should You Test?
Now that it's clear WHAT testing is, let's focus on the WHY.
Why would it be a good idea to write automated tests?
The answer is trivial: It speeds up development because you don't have to test everything manually after every change.
Additionally, it's less error-prone. When testing code manually, it's easy to overlook a certain scenario and therefore to overlook a bug.
Of course you can also write bad automated tests, you can forget an important scenario there, too. But over the lifespan of your project development, you'll very likely encounter issues and add respective tests.
Additionally, if you write tests, you're forced to think about your app and potential issues harder. You have to come up with clever tests that will fail if something important changes.
You are also forced to write cleaner, more modular code because the more spaghetti your code becomes, the harder it will be to test.
Less work, cleaner code, more thinking about your code - doesn't sound too bad, right?
Unit Tests, Integration Tests & End-to-End Tests
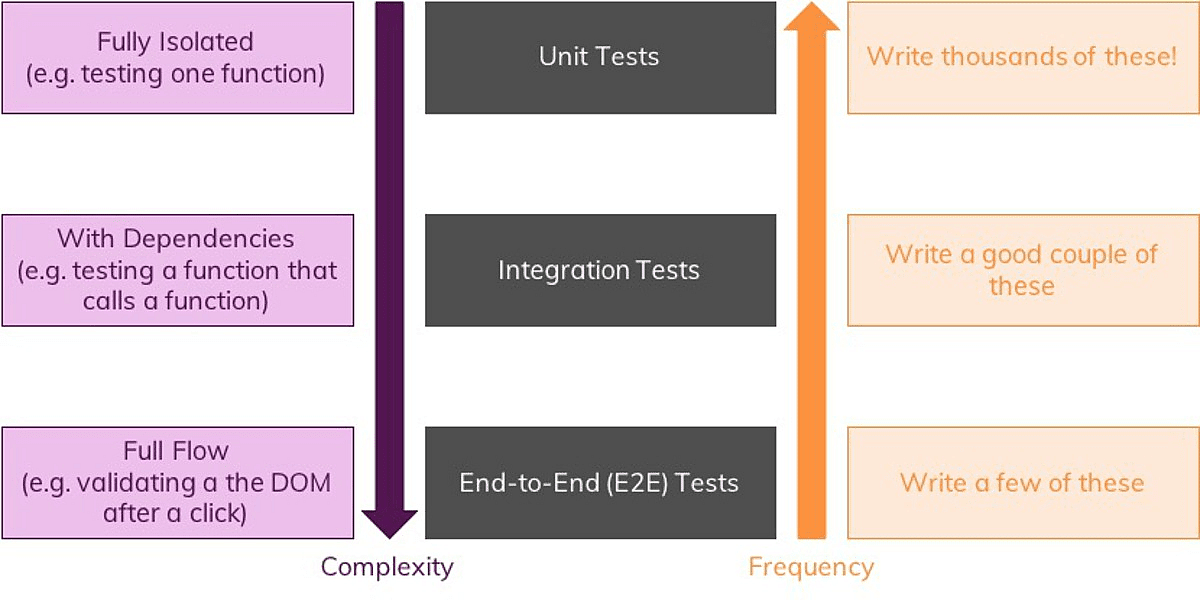
When talking about "tests" or "automated tests" (I'll use these terms interchangeably), we can differentiate between three kind of tests:
- Unit tests that test one isolated unit/ piece of code (e.g. a function)
- Integration tests which test the combination of features (e.g. a function calling another function)
- End-to-End (e2e) or UI tests which test a full interaction path in your app (e.g. the signup process)
These kind of tests have a different level of complexity to write them and a different frequency with which you'll write them.
Unit tests
Unit tests are the easiest tests to write because you have some input and can expect some result. There are no dependencies, no complex interactions.
Here's an example:
Consider this function which we use in our app - it'll take name and age as an input and return some text that contains these two parameters.
const generateText = (name, age) => {
  return `${name} (${age} years old)`
}
Here's a fitting unit test:
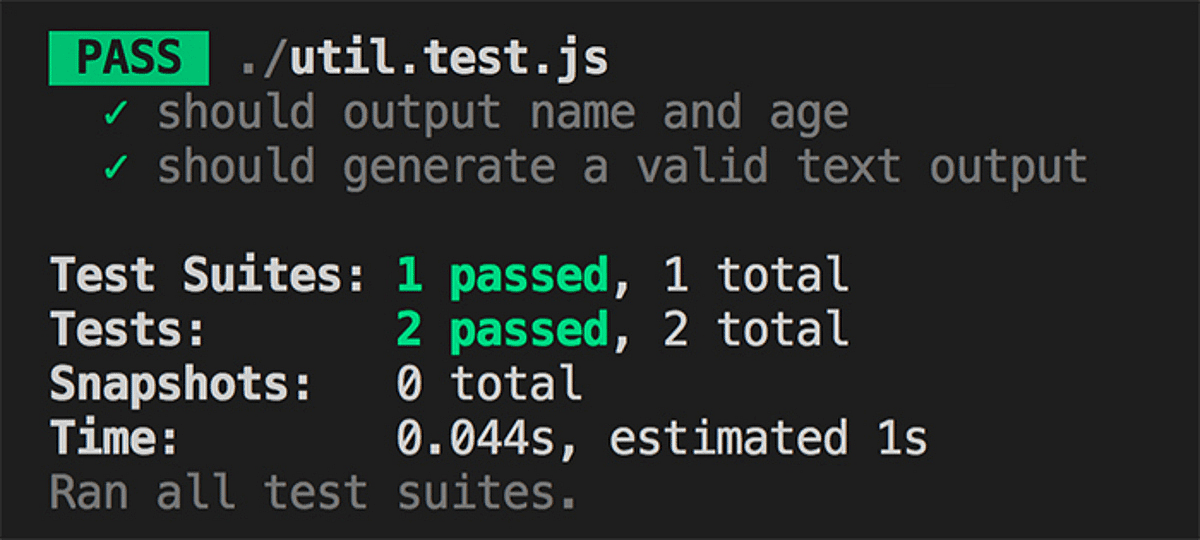
test('should output name and age', () => {
  const text = generateText('Max', 29)
  expect(text).toBe('Max (29 years old)')
})
This test will check whether the generateText function does return the expected text.
If we now change the generateText function, let's say like this:
const generateText = (name, age) => {
  return `${age} (${age} years old)`
}
Then our test will fail. Because this function would return '29 (29 years old)' instead of 'Max (29 years old)'.
I'll come back to where the test and expect functions are coming from!
For that reason, you should split your app into a lot of small modules which you can test individually. This will lead to cleaner code as a nice side-effect.
For the same reason, you'll also write a lot of unit tests in a project. It'll be your most common form of tests. If you test all the individual units of your app, chances are high that the app as a whole will also work.
Integration tests
Integration tests are a bit more complex than unit tests because you now have to deal with some dependencies (e.g. another function that gets called). These dependencies of course also have an impact on the result of your test, hence it's important to write "good" tests which allow you to understand what kind of effect leads to which result.
It's also important to unit-test the dependencies of your integration test as this will help you narrow down issues.
You could also think that integration tests are redundant if you got unit tests for everything.
But that's not the case. Here's an example (which you also see in the above video):
exports.checkAndGenerate = (name, age) => {
  if (!validateInput(name, true, false) || !validateInput(age, false, true)) {
    return false
  }
  return generateText(name, age)
}
Here's a fitting integration test:
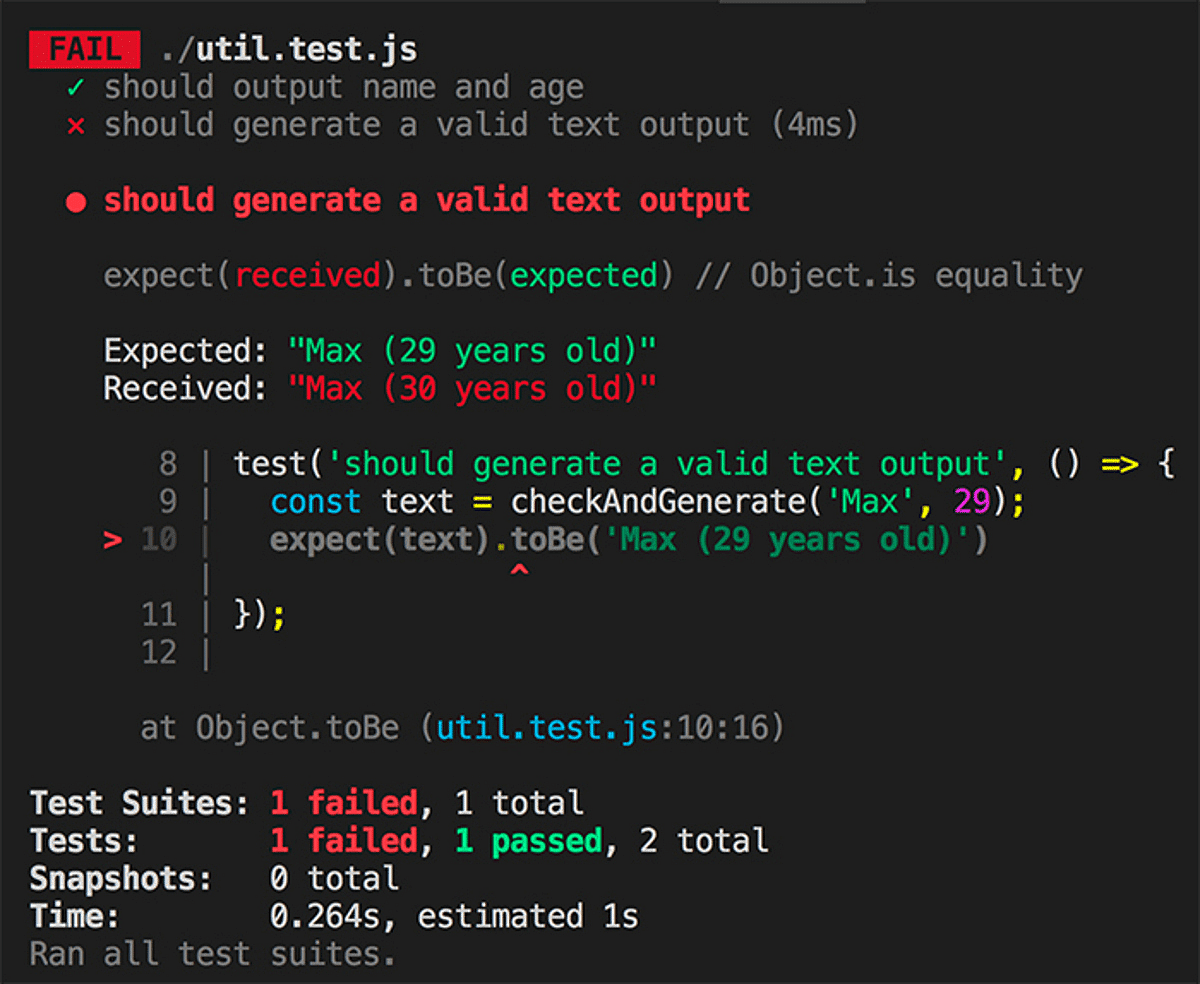
test('should generate a valid text output', () => {
  const text = checkAndGenerate('Max', 29)
  expect(text).toBe('Max (29 years old)')
})
There's no special syntax as you can see. It's a normal test. We just call it integration test because it tests something which does have dependencies.
The checkAndGenerate function returns the result of generateText in the end but before it does so, it also validates the input. It does all that by calling other functions - hence we got a dependency here.
On first look, you could think that this will only fail when either validateInput or generateText have a problem - which would of course be issues that should be detected by a unit test. So why should we test the checkAndGenerate function?
Well, here's the answer. Consider this change to the checkAndGenerate function:
exports.checkAndGenerate = (name, age) => {
  if (validateInput(name, true, false) || !validateInput(age, false, true)) {
    return false
  }
  return generateText(name, age)
}
What changed? I removed the ! in front of the first validateInput call.
That will now break the logic of this function since we now handle the result of validateInput incorrectly. So neither validateInput nor generateText are broken and still checkAndGenerate would yield an invalid result.
That's why you need integration tests!
End-to-End (e2e)/ UI tests
These kinds of tests simulate a certain user interaction flow with your app. This involves clicking, entering text etc.
And since it involves this, we need a browser. Actually all tests run in the browser but they'll not load up your app. They just need a browser JavaScript environment (i.e. essentially an empty browser window that's loaded up behind the scenes).
For end-to-end/ UI testing, we need a browser that loads our app though. And we need to be able to control that browser via code (so that we can program certain user interactions and simulate them).
There are tools for that and I'll dive into them in the next section.
First of all, let me show you what a test would look like:
test('should create an element with text and correct class', async () => {
  const browser = await puppeteer.launch({
    headless: true,
  })
  const page = await browser.newPage()
  await page.goto('localhost:3000/your-page')
  await page.click('input#name')
  await page.type('input#name', 'Anna')
  await page.click('input#age')
  await page.type('input#age', '28')
  await page.click('#btnAddUser')
  const finalText = await page.$eval('.user-item', el => el.textContent)
  expect(finalText).toBe('Anna (28 years old)')
}, 10000)
You can see that we simply tell the browser what to do. And at the end, we can get access to the DOM elements and validate their state, values, CSS classes - whatever we want to do.
Tools for Testing
To run all the test code you saw above, we need certain tools.
Because the test code is not part of your app code!
We only write it to execute it during development, it will not be shipped together with your app code. It will never run in the browser of your application users. That's really important to understand!
Instead, we need some tools that allow us to execute our tests locally, define our expectations (and check them) and control the browser for e2e testing.
In short, we need three kinds of tools:
- A test runner that executes your tests (
test()) and summarizes the results - An assertion library (
expect()) that allows you to define your expectations (and check them) - An e2e testing tool, often you use a (headless) browser for this
Test runners
The test runner executes your tests and summarizes the results in the terminal. Mocha is very popular but Jest really is the new star in the JavaScript testing scene.
The code above and the project shown in the video also use Jest. It's easy to use, well-documented and very powerful.
You can install Jest into your project (assuming you're using npm for managing it) by running:
npm install --save-dev jestAssertion library
You also need to be able to define your expectations and check them. Assertion libraries like Chai help you with that.
But here, we also can use Jest! And that's the cool thing about it. Besides being powerful and all that, it's also not just a test runner but test runner + assertion library combined. Another reason for its popularity.
e2e-testing tools
For e2e-testing, Selenium is pretty popular but Puppeteer is even more popular.
Puppeteer is a headless version of the Google Chrome browser. And it's even developed by the Google Chrome team. It's meant to be used as a headless version of Chrome (though you can even run it with an UI attached) and it's great for automated testing.
Puppeteer - which I use in this article + video - can be installed with this command:
npm install --save-dev puppeteerWriting Tests
With the "WHAT", "WHY", tooling and kinds of tests explained - it's time to write tests, right?
You saw snippets above and you can see the full project in the video that you find at the top of the page.
Tests are really all about defining code that should be executed by the test runner and checked via the assertion library.
With Jest, you can define a new test with the test function. It's globally available when running Jest. Jest will automatically execute files that end with .spec.js or .test.js hence you should place your tests in there.
Example:
// inside util.test.js - which should test functions defined in util.js
const { generateText } = require('./util')

test('should output name and age', () => {
  const text = generateText('Max', 29)
  expect(text).toBe('Max (29 years old)')
})
Here, we first of all import the functions we want to test. Jest supports these Node-style imports, it does not support ES module imports by default.
Thereafter, a test is defined via the test function.
As you can see, two arguments are passed to test. A description of the test which will show up in the test summary once you execute your tests. And an anonymous function that contains your test logic.
Inside the test logic/ code, you find the expect function.
This function is provided by the assertion library - Jest in our case.
The "expectable" object which you get then has a bunch of built-in methods that allow you to compare the result/ value you're checking with a result/ value you would have expected.
toBe(5) would check if a value is equal to 5 for example. But you can also check other things like:
toBeCalled=> Was a function executed during the test?not.toBe(5)=> Is the value not 5?- And much more, all to be found here.
You can then execute your tests by running Jest, e.g. by adding a script to your package.json file:
"scripts": {
  "test": "jest"
},
After that, just run npm test to run all your tests and get the result in the same terminal.
It's also possible to run tests in watch mode so that they automatically re-run whenever you change something:
"scripts": {
  "test": "jest --watch"
},
The test runner will gather errors/ unexpected values and mark the test as failed as soon as at least one expectation in a test (you can have multiple ones) fails.
As you saw earlier in the article, there also is no syntactical difference between unit tests and integration tests.
For e2e-tests, the general approach of using test and expect also doesn't change. But we have some additional code in our tests since we use external tools (like Puppeteer) to control the browser:
const puppeteer = require('puppeteer')

test('should create an element with text and correct class', async () => {
  const browser = await puppeteer.launch({
    headless: true,
  })
  const page = await browser.newPage()
  await page.goto('localhost:4000/your-page')
  await page.click('input#name')
  await page.type('input#name', 'Anna')
  await page.click('input#age')
  await page.type('input#age', '28')
  await page.click('#btnAddUser')
  const finalText = await page.$eval('.user-item', el => el.textContent)
  expect(finalText).toBe('Anna (28 years old)')
}, 10000)
We launch a browser (that can be controlled via the test) with puppeteer.launch. This browser object can then be used to create new pages (newPage()), navigate to different URLs (goto()) and interact with the page (e.g. click()).
Since all that code interacts with a real browser, we can then also use some built-in methods (e.g. $eval) to evaluate DOM elements. In the example, we extract the textContent of a created element. At the end, expect is used again to check whether the created element has a valid text or not.
Summary & Next Steps
Now that you know what testing is about, how it works, which tools you need and how to write tests, it's time to dive in deeper.
There are more complex testing scenarios (e.g. async code, Http requests) that you'll be facing in your projects.
The official docs and future content here on Academind should be helpful for mastering testing though.