
Implementing Pagination in React
In today's world, most web applications cannot show all the data they need to show to their users at once and there are good reasons to not show all the data at once.
A couple of important reasons are:
- Easier Navigation
- User Experience
Web applications that need to show some data in the form of a list usually implement a feature known as pagination which allows them to show the data in a sequence of pages.
This allows applications to provide a better user experience and allows users to navigate through the data easily. Pagination also helps applications to avoid requesting all the data from the server at once which could potentially take a lot of time - depending on the amount of data requested.
Pagination is mostly implemented in coordination with the server-side code that allows the client applications to request the data in the form of groups. For example, a client could ask the server for a list of the first 20 products.
On the front-end, applications need to indicate to the user that the data is paginated and can be viewed in a sequence of pages.
In this tutorial, we will not write any server-side code but we will learn how we can implement pagination in a front-end application and how we may show the data to the user in a sequence of pages, where the user can navigate back and forth. To implement pagination, we will create a re-usable component that will show the data in a paginated form.
What we will create
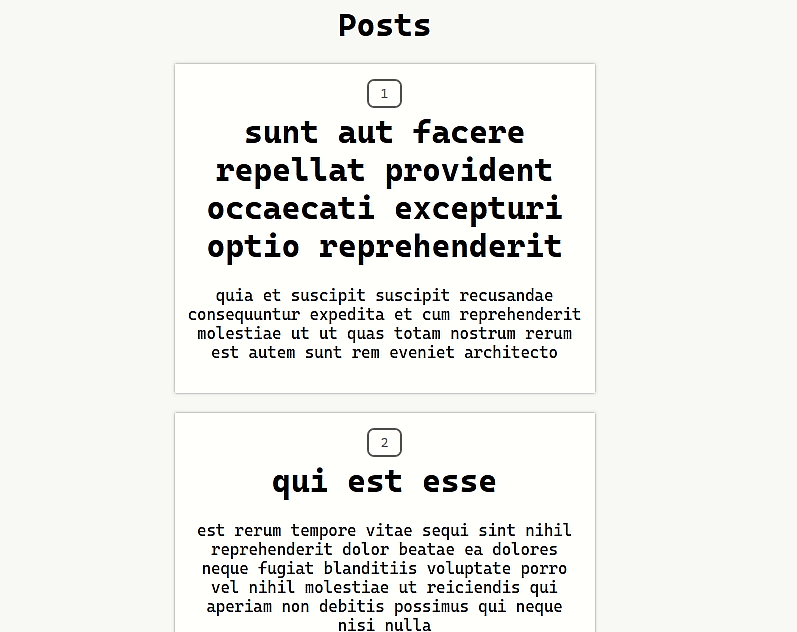
The following image shows the pagination that we will implement without using any third-party library for pagination.

Setting up a React Project
We will create a simple React application which will show the list of posts to the user.
Posts will be fetched from the jsonplaceholder API using the following URL:
https://jsonplaceholder.typicode.com/postsAlthough the jsonplaceholder API doesn't allows us to request data in a paginated form, we can fetch all the posts and then instead of showing all the posts to the user at once, we will show 10 posts on one page.
Note: Of course, in reality, we would be dealing with a backend which also allows us to send requests to get chunks of data (instead of all the data at once). You can learn how to write server-side code in our NodeJS course.
You can set up a React project using create-react-app or use any online editor like Stackblitz or Codesandbox.
Lets write the code in the App component, which will request posts from the jsonplaceholder API and save it in its state.
import React, { useState, useEffect } from 'react';

const url = 'https://jsonplaceholder.typicode.com/posts';

export default function App() {
  const [posts, setPosts] = useState([]);
  const [error, setError] = useState('');

  useEffect(() => {
    fetch(url)
      .then((response) => {
        if (response.ok) return response.json();
        throw new Error('something went wrong while requesting posts');
      })
      .then((posts) => setPosts(posts))
      .catch((error) => setError(error.message));
  }, []);

  if (error) return <h1>{error}</h1>;

  return <div></div>;
}
We save two things in the state:
- The posts
- An error to show if requesting posts fails
After that we use the useEffect hook to request posts from the API. The request is made using the fetch API. Once the response is received, we check if the request's response is a success response with a status code in the range of 200 to 299.
If the success response is received, response.json() is called and the result (a promise) is returned. If posts are fetched successfully, they are saved in the state.
If we do not receive a success response as a result of our request, we throw an error indicating that fetching posts failed. This error is caught by the .catch() block and is saved in the state.
Now, lets create a Post component which will present a single post.
function Post(props) {
  const { id, title, body } = props.data;
  return (
    <div className="post">
      <small>{id}</small>
      <h1>{title}</h1>
      <p>{body}</p>
    </div>
  );
}
This component will receive an object as a prop named data and we will destructure 3 properties from that data object:
- The post id
- The post title
- The post content
After destructuring the required properties, we will render them as part of our JSX code.
For the sake of completeness, here's is the CSS that I used to style the post component:
.post {
  display: flex;
  flex-direction: column;
  justify-content: center;
  align-items: center;
  box-shadow: 0 0 3px rgba(0, 0, 0, 0.3);
  max-width: 400px;
  margin: 20px auto;
  padding: 15px 10px;
  background: #fff;
}

small {
  border: 2px solid #777;
  border-radius: 7px;
  padding: 5px 12px;
  color: #777;
}
Implementing Pagination
After setting up the React project, we are now in a position to implement pagination in our application.
There are different types of pagination that can be seen in many web apps. Some only show "next" and "previous" buttons to go to next or the previous page. Some also show the current page number, the page number of the next and previous page and also the total number of pages.
We will show 5 page numbers at a time and also show "next" and "previous" buttons to go to next or previous page.
We will also allow the user to click on any page number to go to that page. For example, if we have total 100 posts and we want to show 10 posts per page, then we will have a total of 10 pages and we will show only 5 pages at a time and if user is currently on page 5, clicking next button will show pages from 6 to 10. If its not clear, it will be once we implement the pagination.
function Pagination({ data, RenderComponent, title, pageLimit, dataLimit }) {
  const [pages] = useState(Math.round(data.length / dataLimit));
  const [currentPage, setCurrentPage] = useState(1);

  function goToNextPage() {
     // not yet implemented
  }

  function goToPreviousPage() {
     // not yet implemented
  }

  function changePage(event) {
     // not yet implemented
  }

  const getPaginatedData = () => {
     // not yet implemented
  };

  const getPaginationGroup = () => {
     // not yet implemented
  };

  return (
    ...
  );
}
The above code shows the structure of the Pagination component that we will use to implement the pagination in our application.
This component receives 5 props:
data: An array of data that should be shown in the paginated formRenderComponent: A component that should be used to show the paginated data. In our case, this will the thePostcomponent that we created earlier.title: This is the title that should describe what the data is about. In our case, it will be thePostsdataLimit: The number of posts to be shown on each page. In our case, it will be 10.pageLimit: The number of pages to be shown in the pagination. In our case, it will be 5 pages at a time.
We will save 2 things in our state:
pages: The total number of pages. This will be calculated by dividing the length of thedataarray that will be passed to this component as a prop, by thedataLimitwhich is the number of posts we will show on each page. We also need to round off the result of this division.currentPage: This is the current page that the user is currently visiting. The initial value will be 1.
After that, we have 5 functions that will be explained after they have been implemented. Once we have implemented these functions, we will complete the JSX code that will be returned from the Pagination component.
Now lets implement each function.
goToNextPage will increment the current page by calling setCurrentPage.
function goToNextPage() {
  setCurrentPage((page) => page + 1);
}
Note: We're using the function form of the state updating function here, since our new state depends on the previous state. Learn more about React, how to manage state in React and why the function form is recommended here in our React - The Complete Guide course!
The goToPreviousPage function will decrement the current page by calling setCurrentPage.
function goToPreviousPage() {
  setCurrentPage((page) => page - 1);
}
The changePage function will be called when the user clicks on any page number and it will change the current page to the page number that was clicked by the user.
function changePage(event) {
  const pageNumber = Number(event.target.textContent);
  setCurrentPage(pageNumber);
}
Using event.target, we extract the page number from the pagination item the user clicked on. Then after converting it to a number, we call setCurrentPage.
The getPaginatedData function, when called, will return the number of posts equal to the dataLimit (10 posts in our case), which will then be displayed to the user.
const getPaginatedData = () => {
  const startIndex = currentPage * dataLimit - dataLimit;
  const endIndex = startIndex + dataLimit;
  return data.slice(startIndex, endIndex);
};
To decide which 10 posts to show, the getPaginatedData function calculates start and end indexes.
The start index is calculated using the currentPage and dataLimit and the end index is calculated by adding the start index and the dataLimit.
Once we have the start and end indexes, we slice the data array and return the sliced array. This sliced array will be used to show the posts on the current page.
The getPaginationGroup function is used to show the group of page numbers in the pagination. In our case, as we have set pageLimit to 5, so we will show 5 page numbers at a time to the user.
const getPaginationGroup = () => {
  let start = Math.floor((currentPage - 1) / pageLimit) * pageLimit;
  return new Array(pageLimit).fill().map((_, idx) => start + idx + 1);
};
This function calculates the starting point that will be used to show the subsequent page numbers. For example, if start is 0, then this function will return an array that looks like:
[1, 2, 3, 4, 5];and if start is 5, then the array returned by this function will be:
[6, 7, 8, 9, 10];These numbers represent the page numbers that will be shown to the user in groups of 5. It will be more clear if you see it in action, so let's continue and complete the Pagination component.
Now that we have implemented the functions, the only thing that left in our Pagination component is the JSX code that will be returned by this component.
return (
  <div>
    <h1>{title}</h1>

    {/* show the posts, 10 posts at a time */}
    <div className="dataContainer">
      {getPaginatedData().map((d, idx) => (
        <RenderComponent key={idx} data={d} />
      ))}
    </div>

    {/* show the pagiantion
        it consists of next and previous buttons
        along with page numbers, in our case, 5 page
        numbers at a time
    */}
    <div className="pagination">
      {/* previous button */}
      <button
        onClick={goToPreviousPage}
        className={`prev ${currentPage === 1 ? 'disabled' : ''}`}
      >
        prev
      </button>

      {/* show page numbers */}
      {getPaginationGroup().map((item, index) => (
        <button
          key={index}
          onClick={changePage}
          className={`paginationItem ${currentPage === item ? 'active' : null}`}
        >
          <span>{item}</span>
        </button>
      ))}

      {/* next button */}
      <button
        onClick={goToNextPage}
        className={`next ${currentPage === pages ? 'disabled' : ''}`}
      >
        next
      </button>
    </div>
  </div>
);
The above JSX code contains comments that can be used to understand the hierarchy of the different elements/components inside the Pagination component.
Here is the CSS to style the Pagination component. Instead of using the following CSS, you can write your own to style the Pagination component as you like.
.pagination {
  display: flex;
  align-items: center;
  justify-content: center;
}

.paginationItem {
  background: #fff;
  border: 2px solid #666;
  padding: 10px 15px;
  border-radius: 50%;
  height: 45px;
  width: 45px;
  position: relative;
  margin: 0 5px;
  cursor: pointer;
}

.paginationItem span {
  position: absolute;
  top: 50%;
  left: 50%;
  transform: translate(-50%, -50%);
}

.prev,
.next {
  background: #fff;
  border: none;
  padding: 10px;
  color: blue;
  box-shadow: 0 0 3px rgba(0, 0, 0, 0.4);
  margin: 0 10px;
  cursor: pointer;
}

.paginationItem.active {
  border: 1px solid #888;
  color: #888;
  pointer-events: none;
}

.prev.disabled,
.next.disabled {
  pointer-events: none;
  box-shadow: none;
  color: #999;
}
Using the Pagination Component
Finally, we are ready to use the Pagination component in our application. As we are fetching the posts in App component, we will use the Pagination component in the App component and pass the required props to this component.
export default function App() {
  const [posts, setPosts] = useState([]);
  const [error, setError] = useState("");

  useEffect(() => {
    ...
  }, []);

  if (error) return <h1>{error}</h1>;

  return (
    <div>
      {posts.length > 0 ? (
        <>
          <Pagination
            data={posts}
            RenderComponent={Post}
            title="Posts"
            pageLimit={5}
            dataLimit={10}
          />
        </>
      ) : (
       <h1>No Posts to display</h1>
      )}
    </div>
  );
}
Inside the App component, we are conditionally rendering the Pagination component depending on whether we have any posts or not. As the Pagination component takes 5 props, we have passed the required props to it to see the posts in the paginated form.
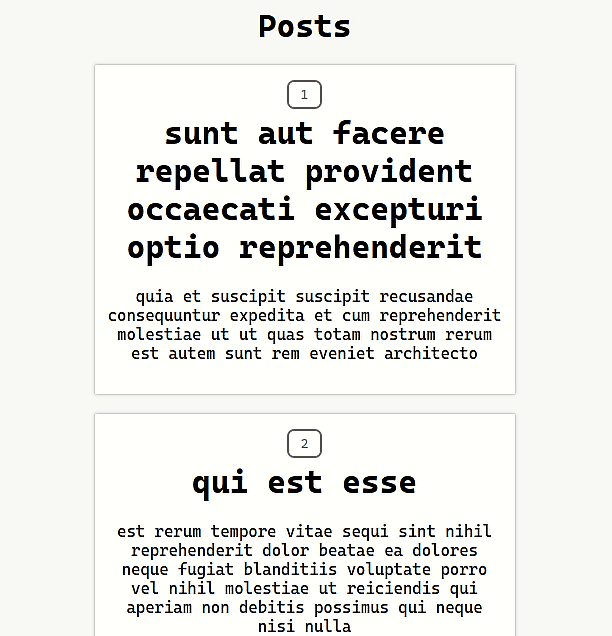
Result
The following image shows the Pagination component in action
Scroll to Top on Page Change
One thing that you probably noticed in the image above is that whenever page changes, the page doesn't scroll up. The user will have to manually scroll to the top, which is not a great user experience.
Ideally, the page should scroll to the top whenever we change the page. This can easily be implemented by using the useEffect hook which executes whenever the current state changes.
To scroll to the top, we can use window.scrollTo method.
Add the following code in the Pagination component.
useEffect(() => {
  window.scrollTo({ behavior: 'smooth', top: '0px' });
}, [currentPage]);
Final Result
The following image shows the result of adding scrolling in the Pagination component.
Final Thoughts
Although we used React in this tutorial, the logic we implemented for the pagination can be used in any front-end framework and it will work exactly as it will work with React. This Pagination component is reusable and can be extended to change the style of the pagination.
If you would be fetching data in chunks, instead of all the data at once (as we're doing it here), you would basically want to fetch the next chunk of data whenever the page changes.