
Build your custom email signature with HTML and CSS
Tired of typing your name at the end of every email you send?
In this article you'll learn how to build your own email signature with HTML and CSS, and style it your own way.
Here is the final product you can build, that has social media icons, phone number, email and website that can be clicked and redirect people to links!

In this article, I'm gonna share with you the creation process, step by step:
Table of contents:
- Getting the icons
- Styling the icons
- Hosting the icons
- Writing the HTML and CSS code
- Adding the signature to the email provider
You can do the same and show the world your coding skills from a simple email signature. Let's get onboard and start this coding adventure!
Note: Disclaimer: after trying out the signature for a few months, it looks like its content triggers email spam filters, so your emails could get into the spam folder of your senders, not the nicest thing 😬. But use this article to get an idea of how to use HTML and CSS and have some fun!
Getting the icons
The first thing is to find good free quality icons, and the best place is https://uxwing.com/, because they don't require you to add attributions in your code when using them.
In this example, I'll just add three social media icons: Twitter, LinkedIn and GitHub. So, it's a matter of searching for them in the page provided and download the PNG format.
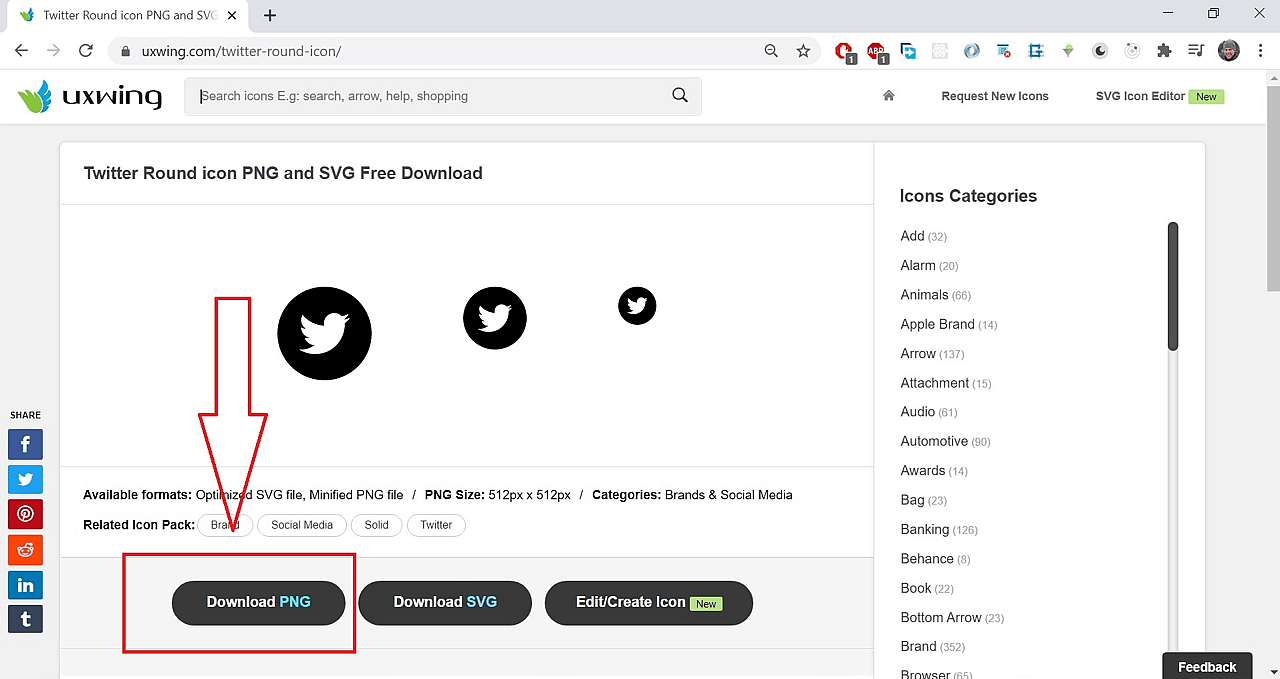
Then, download mobile, envelope and globe icons.
Styling the icons
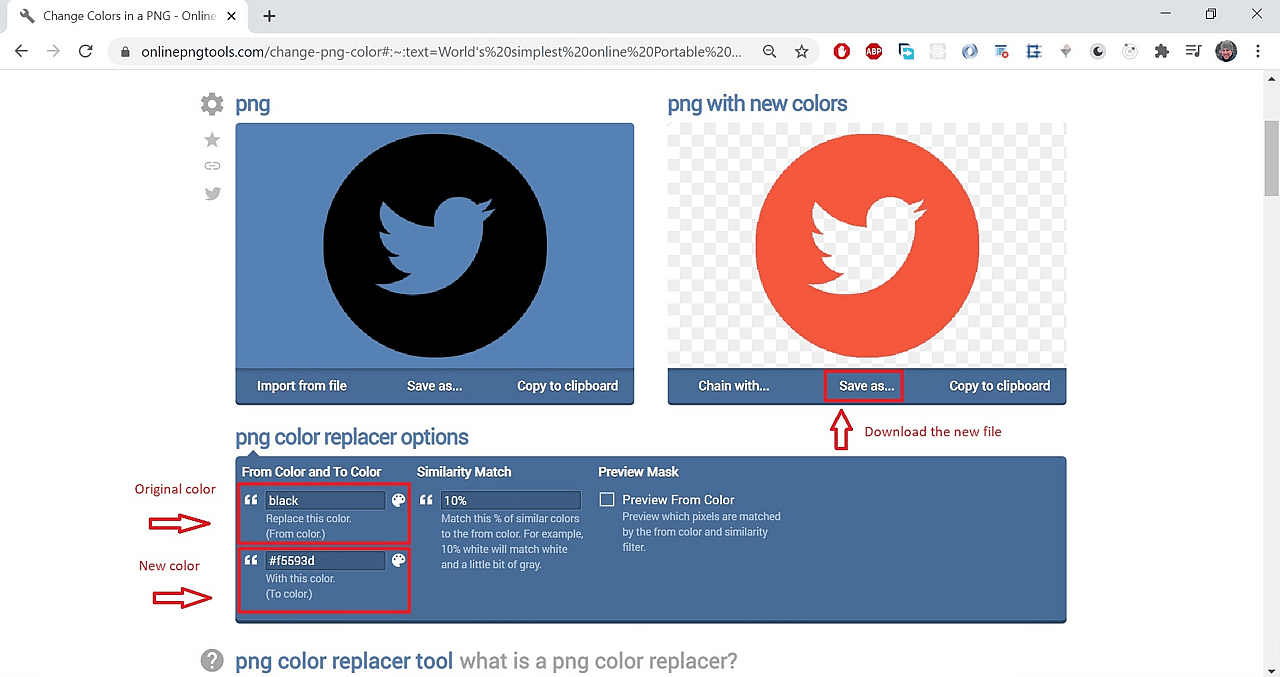
All these icons have transparent background and are black. This color might meet your needs, but chances are you want to use a custom color. In order to change it, let's use a super nice online tool:
Onlinepngtools - change color. You can upload your !png file and change the color. Here, I've changed the default black for #f5593d.
Feel free to experiment with your own colors; there are loads of websites to help you select the best ones.
Let's repeat this step of changing colors for all the downloaded icons.
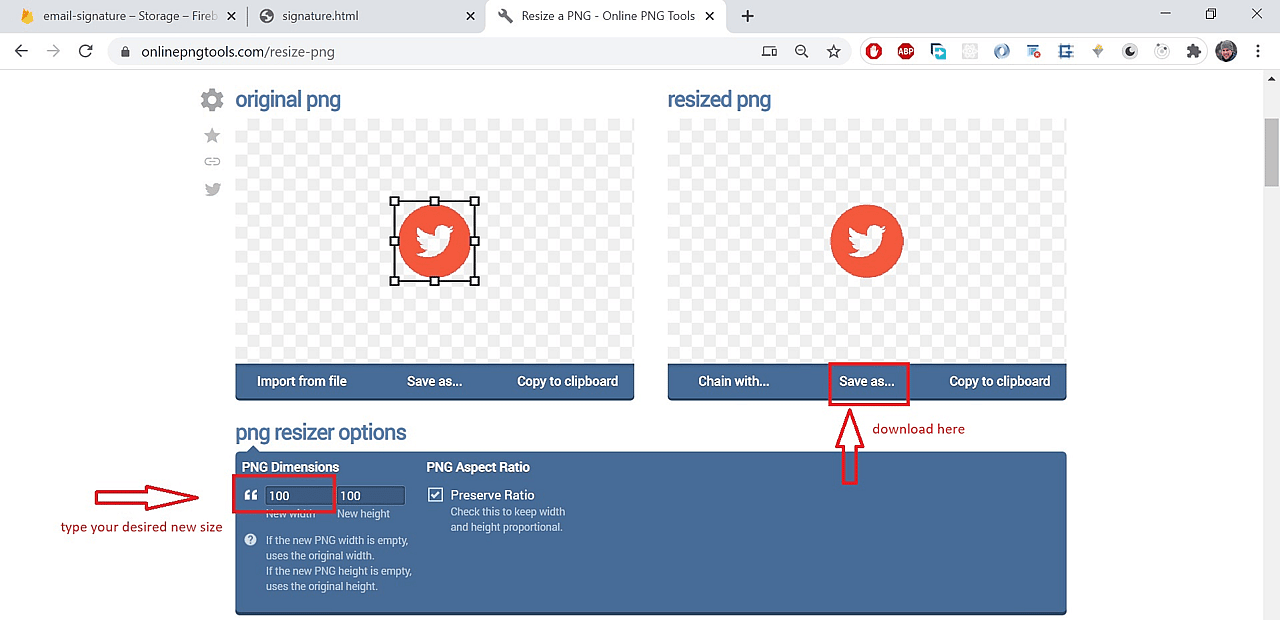
The original sizes of the icons are quite big and in this article and as we plan to use them in small sizes, let's reduce its size with Onlinepngtools - resize png. I've chosen the new width to be 100px and keep the aspect ratio. To change the size, just add the new width value like this:
Hosting the icons
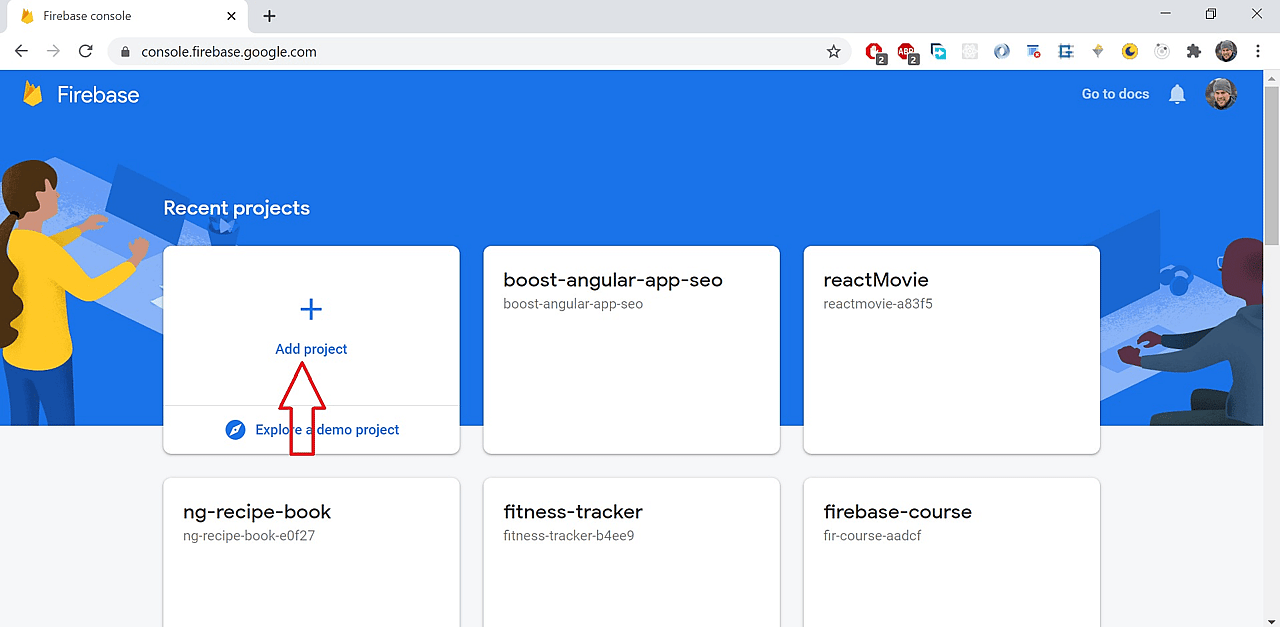
Images used in HTML must be hosted somewhere. To do this, I've decided to use Firebase, because it's got a great CDN, so the assets (in this case, the icons) will be delivered super fast.
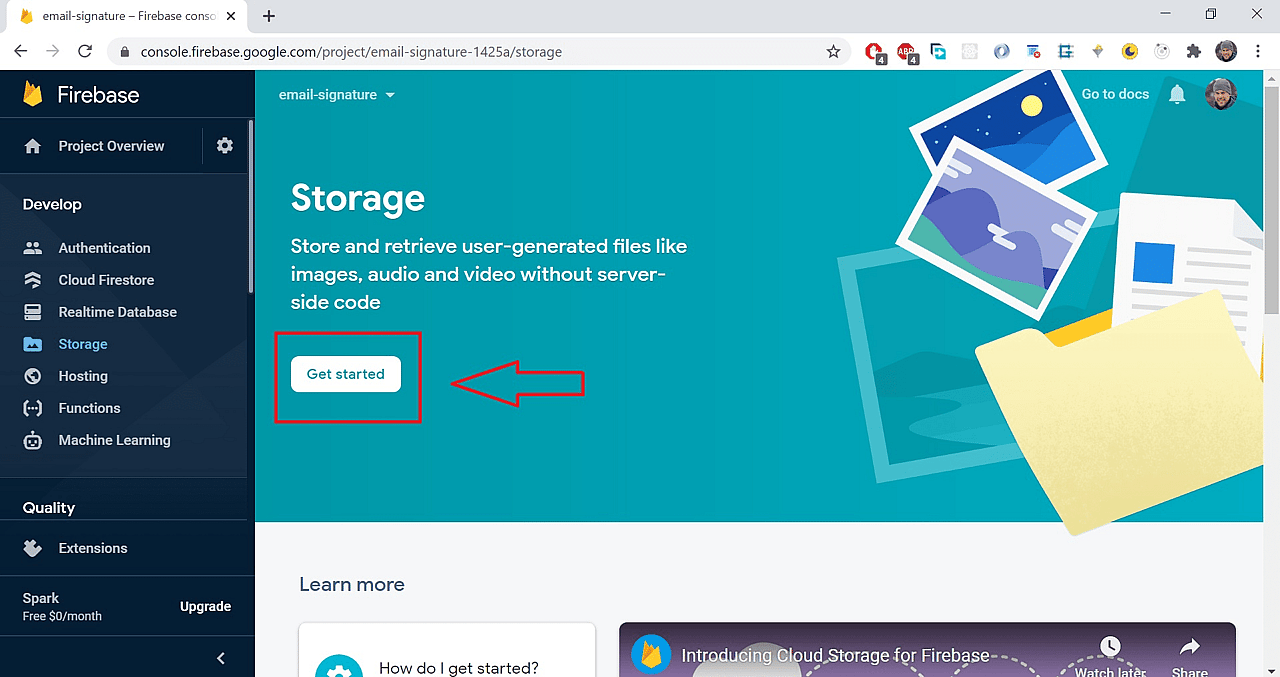
Go to your Firebase console and create a project and click on add a project:
Then, just follow the 3 steps required to create the project. Once it has been created, we want to use the storage option from the left menu:
Then just follow the 2 steps required without changing any default config, unless you know what you're doing.
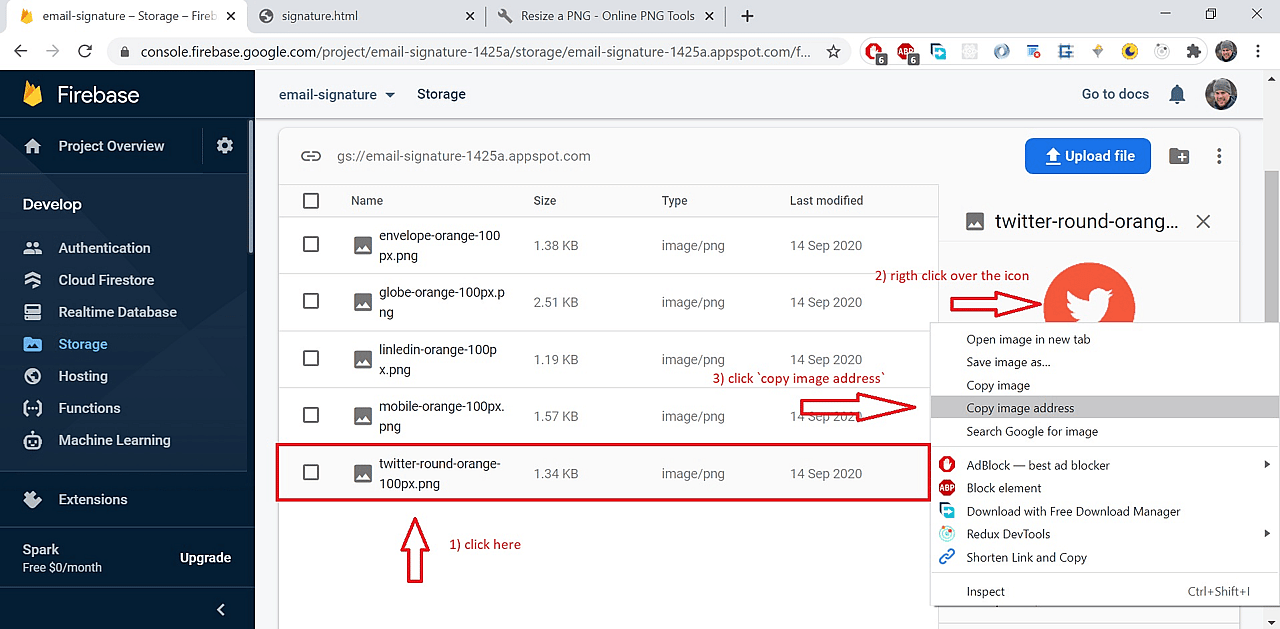
Once the storage bucket has been successfully created, you'll be able to upload your first icon by click on upload file:

You can upload all the icons at once by selecting multiple ones, so you don't need to upload each file separately.
Once the icons were uploaded, just get the image address of each one by following these steps:
If you paste the address on your browser, you should see this:
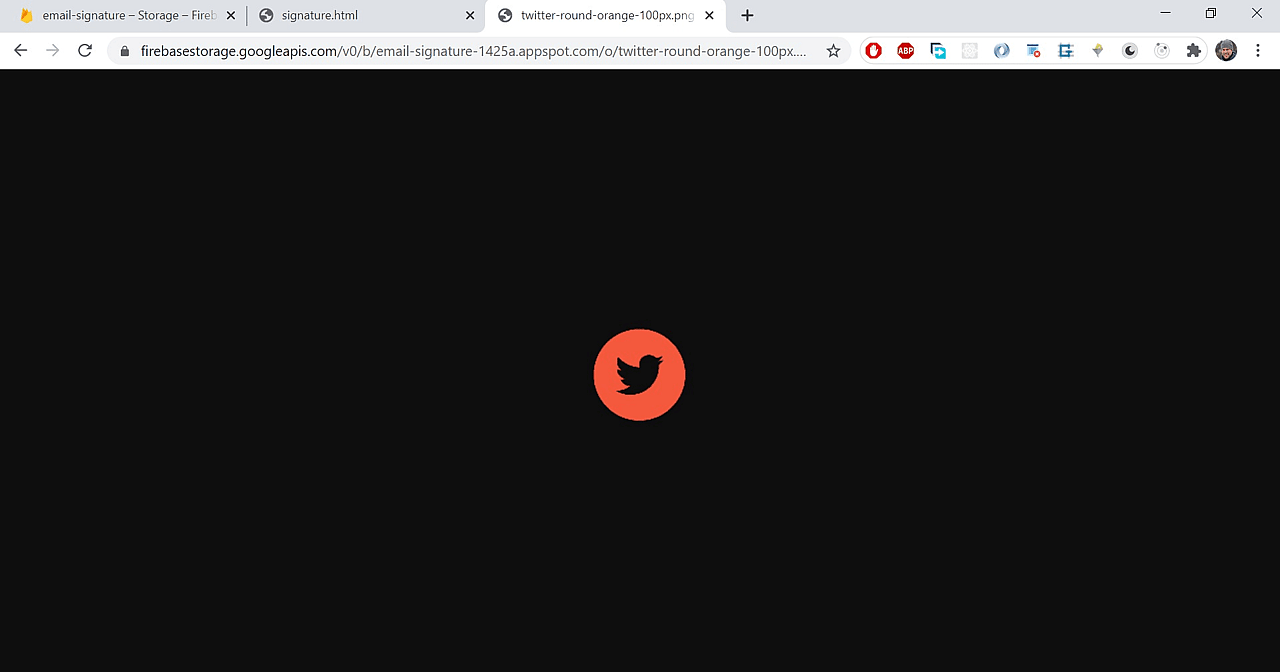
It means that the styled icon is now available for the entire world!
Writing the HTML and CSS code
Now is the time to express all your creativity.
This is my personal approach to styling: I've chose a simple signature, with just 2 colors (apart from the white background).
The color palette for this project is:
- background:
white - icons and small details:
#f5593d - Letters:
#9a9a9a
Bear in mind that sometimes, less is more, so you don't wanna bloat your signature with loads of colors, images, and all crammed.
I've created one html file with this content:
<table
cellpadding="0"
cellspacing="0"
style="vertical-align: -webkit-baseline-middle; ; font-family: Arial;"
>
<tbody>
<tr>
<td>
<table
cellpadding="0"
cellspacing="0"
style="vertical-align: -webkit-baseline-middle; ; font-family: Arial;"
>
<tbody>
<tr>
<td width="46">
<div></div>
</td>
<td style="padding: 0px; vertical-align: middle;">
<h3
style="margin: 0px; font-size: 18px; color: rgb(154, 154, 154);"
>
<span>Esteban Munch Jones</span>
</h3>
<p
style="margin: 0px; color: rgb(154, 154, 154); font-size: 14px; line-height: 22px;"
>
<span>Front End Engineer</span>
</p>
<table
cellpadding="0"
cellspacing="0"
style="vertical-align: -webkit-baseline-middle; ; font-family: Arial; width: 100%;"
>
<tbody>
<tr>
<td height="20"></td>
</tr>
<tr>
<td>
<table
cellpadding="0"
cellspacing="0"
style="vertical-align: -webkit-baseline-middle; ; font-family: Arial; display: inline-block;"
>
<tbody>
<tr style="text-align: center;">
<td width="5">
<div
style="margin-left: 0px; margin-right: 5px;"
>
<a
href="https://www.linkedin.com/in/estebanmunchjones/"
target="_blank"
>
<img
style="display: inline-block;"
height="25"
src="https://firebasestorage.googleapis.com/v0/b/email-signature-1425a.appspot.com/o/linledin-orange-100px!png?alt=media&token=aff70b55-5dc2-4a88-af72-a5973c3ceb6e"
/>
</a>
</div>
</td>
<td width="5">
<div
style="margin-left: 0px; margin-right: 5px;"
>
<a
href="https://twitter.com/MunchEsteban"
target="_blank"
>
<img
style="display: inline-block;"
height="25"
src="https://firebasestorage.googleapis.com/v0/b/email-signature-1425a.appspot.com/o/twitter-round-orange-100px!png?alt=media&token=8b1770a2-2349-4fad-b861-30c4ab1b38ed"
/>
</a>
</div>
</td>
<td width="5">
<div
style="margin-left: 0px; margin-right: 5px;"
>
<a
href="https://github.com/estebanmunchjones2019"
target="_blank"
>
<img
style="display: inline-block;"
height="25"
src="https://firebasestorage.googleapis.com/v0/b/email-signature-1425a.appspot.com/o/github-orange-100px!png?alt=media&token=e6fb36e2-35d0-4adc-8b9a-42d5497c9c18"
/>
</a>
</div>
</td>
</tr>
</tbody>
</table>
</td>
</tr>
<tr>
<td height="5"></td>
</tr>
<tr>
<td
height="1"
style="width: 100%; border-bottom: 1px solid rgb(245, 89, 61); border-left: none; display: block;"
></td>
</tr>
<tr>
<td height="30"></td>
</tr>
</tbody>
</table>
<table
cellpadding="0"
cellspacing="0"
style="vertical-align: -webkit-baseline-middle; ; font-family: Arial;"
>
<tbody>
<tr height="25" style="vertical-align: middle;">
<td style="width: 30; vertical-align: middle;">
<table
cellpadding="0"
cellspacing="0"
style="margin: 0 auto; vertical-align: -webkit-baseline-middle; ; font-family: Arial;"
>
<tbody>
<tr>
<td style="vertical-align: bottom;">
<span width="30" style="display: block;">
<img
style="display: inline-block;"
height="15"
src="https://firebasestorage.googleapis.com/v0/b/email-signature-1425a.appspot.com/o/mobile-orange-100px!png?alt=media&token=862f77b4-b32d-4789-8ec3-62849b05fdb6"
/>
</span>
</td>
</tr>
</tbody>
</table>
</td>
<td style="padding: 0px; color: rgb(154, 154, 154);">
<a
href="tel:012345678"
style="text-decoration: none; color: rgb(154, 154, 154); font-size: 12px;"
>
<span>012345678</span>
</a>
</td>
</tr>
<tr height="25" style="vertical-align: middle;">
<td width="30" style="vertical-align: middle;">
<table
cellpadding="0"
cellspacing="0"
style="margin: 0 auto; vertical-align: -webkit-baseline-middle; ; font-family: Arial;"
>
<tbody>
<tr>
<td style="vertical-align: bottom;">
<span width="30" style="display: block;">
<img
style="display: inline-block;"
height="10"
src="https://firebasestorage.googleapis.com/v0/b/email-signature-1425a.appspot.com/o/envelope-orange-100px!png?alt=media&token=25c69801-227b-4bd0-90ac-e1e91a4e1db7"
/>
</span>
</td>
</tr>
</tbody>
</table>
</td>
<td style="padding: 0px;">
<a
href="mailto:[email protected]"
style="text-decoration: none; color: rgb(154, 154, 154); font-size: 12px;"
>
<span>[email protected]</span>
</a>
</td>
</tr>
<tr height="25" style="vertical-align: middle;">
<td width="30" style="vertical-align: middle;">
<table
cellpadding="0"
cellspacing="0"
style="margin: 0 auto; vertical-align: -webkit-baseline-middle; ; font-family: Arial;"
>
<tbody>
<tr>
<td style="vertical-align: bottom">
<span width="30" style="display: block;">
<img
style="display: inline-block;"
height="15"
src="https://firebasestorage.googleapis.com/v0/b/email-signature-1425a.appspot.com/o/globe-orange-100px!png?alt=media&token=32dd1425-9b95-4bb1-81d4-4d237df466f3"
/>
</span>
</td>
</tr>
</tbody>
</table>
</td>
<td style="padding: 0px;">
<a
href="https://munchjones.com"
style="text-decoration: none; color: rgb(154, 154, 154); font-size: 12px;"
>
<span>munchjones.com</span>
</a>
</td>
</tr>
</tbody>
</table>
</td>
</tr>
</tbody>
</table>
</td>
</tr>
</tbody>
</table>The code can be scary at first, but it's just a combination of <table>, <tbody>, <tr> and <td>. If you have never worked with these html tags, take a look at this resource.
If you wanna get really solid with CSS, the best way is to do this course by Academind: CSS: The Complete Guide 2020 - including Flexbox grid & Sass
In this case, the CSS code is written inside <style> tags to avoid creating a .css file to write the styling rules there. The inline approach, which is called inline styling, is very suitable for small code snippets like this one.
Make sure you replace the data with your personal one, and don't forget to replace the href links of Twitter, LinkedIn, GitHub, phone, email and website. If you haven't noticed it yet, these 3 icons are clickable, so when people get your email signature, they'll be able to go to your profiles. And when they click on the phone, email and website paragraphs they're gonna be redirected. Pretty neat, isn't it?
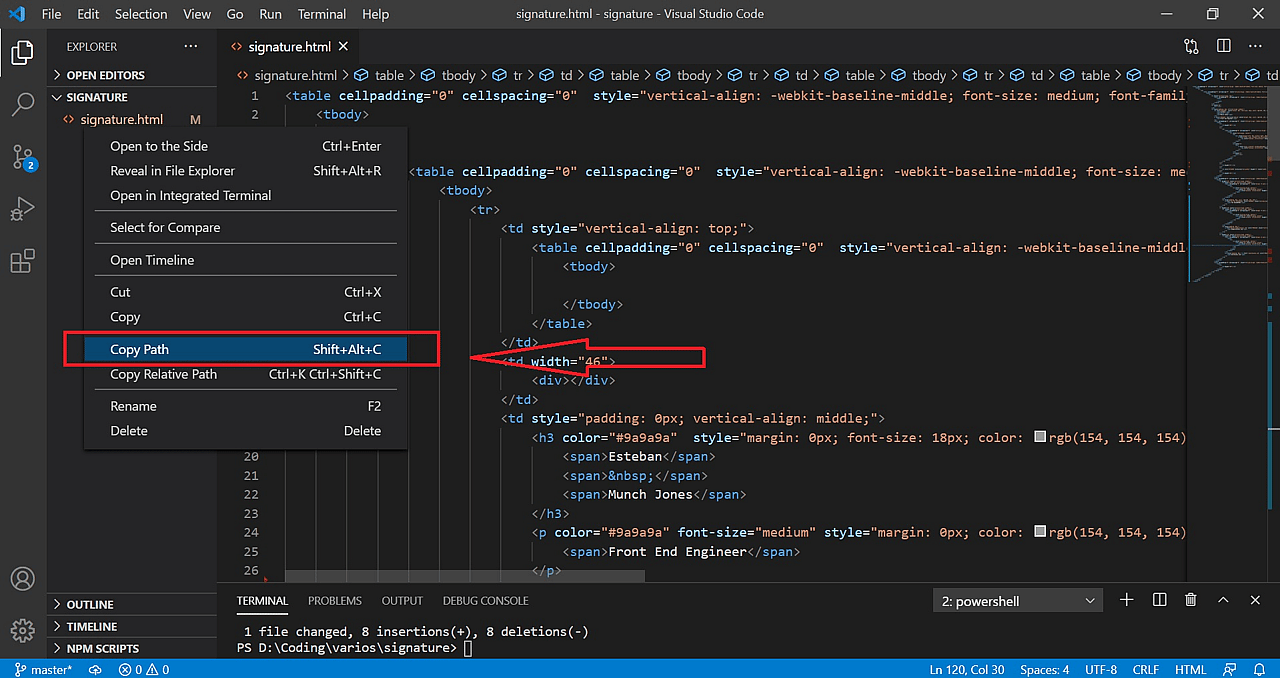
You can create a .html file with the name of your choice, and paste the code inside.
Then, to actually see the code rendered in the browser, you need to copy the file path:
Then, go to your favorite browser an paste the address in the navigation bar and press enter.
Adding the signature to the email provider
To wrap this project up, let's add this signature to an email provider. In my case, I use Gmail, and the following step may vary depending on your provider.
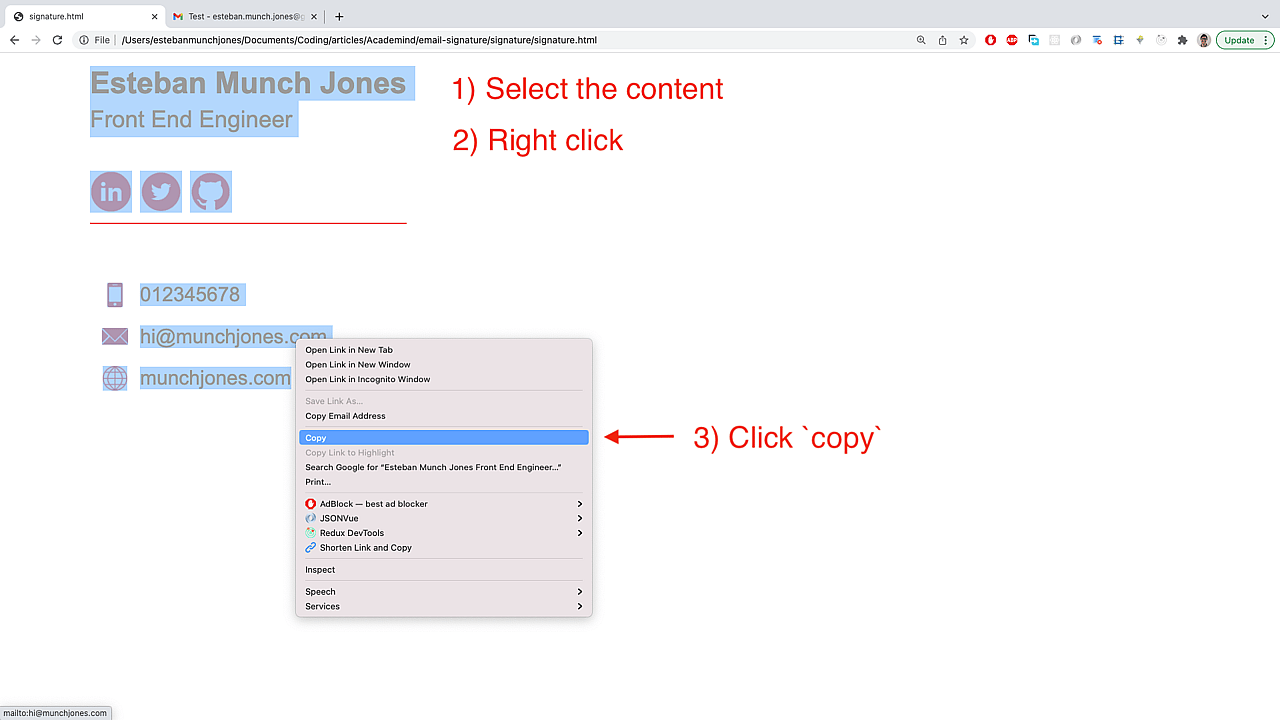
- Copy the signature by keeping the left click pressed and hover over the content and copy it:
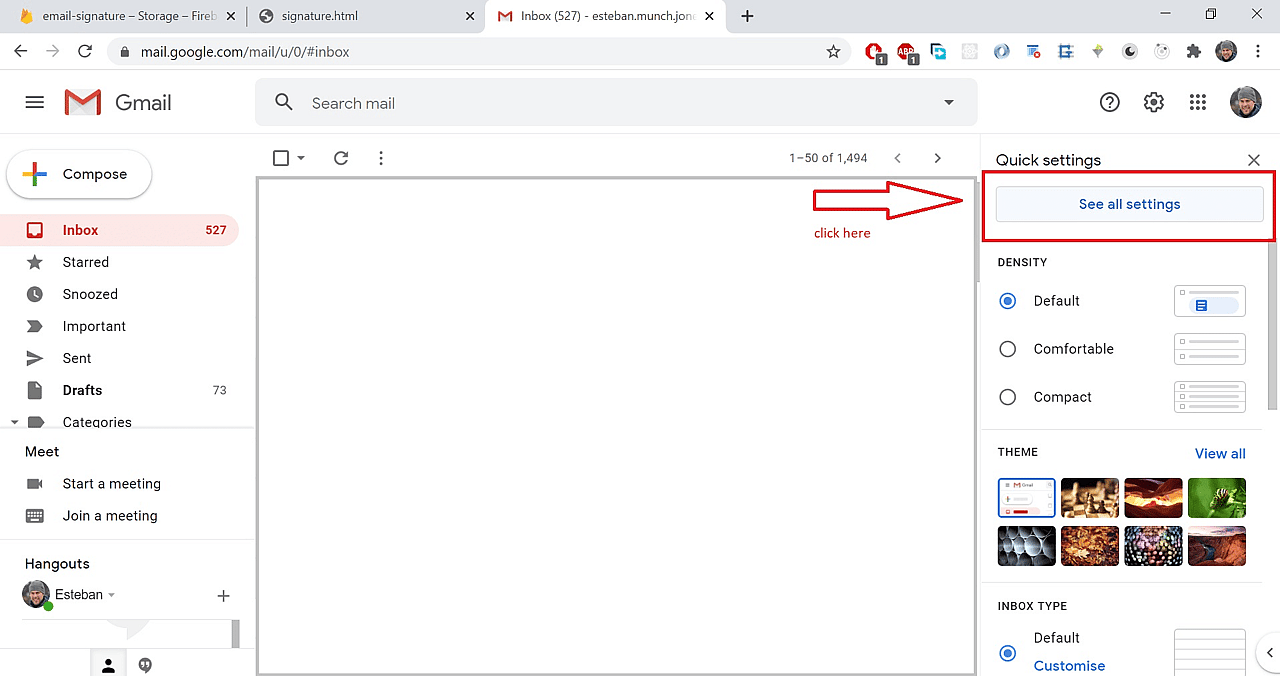
- Then, go to your Gmail account and click on
see all settings:
- Now, create a new signature:
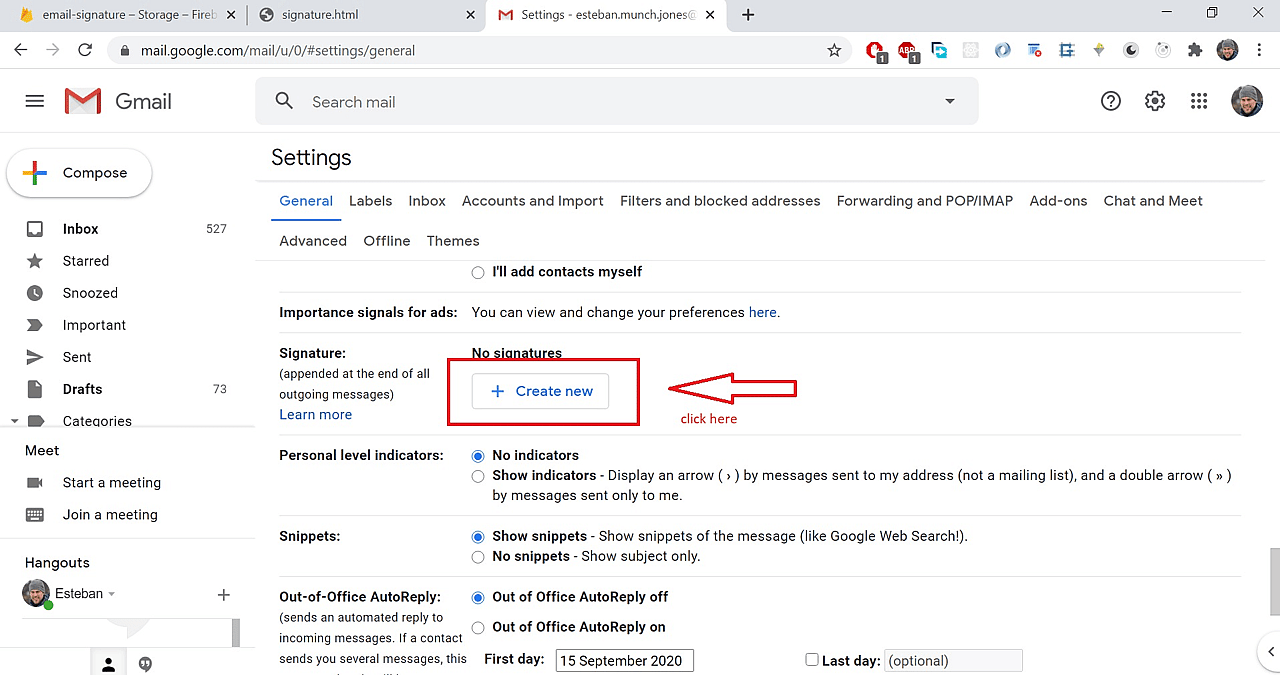
- You'll be prompted with a form to fill the name of your signature, so put the name you want.
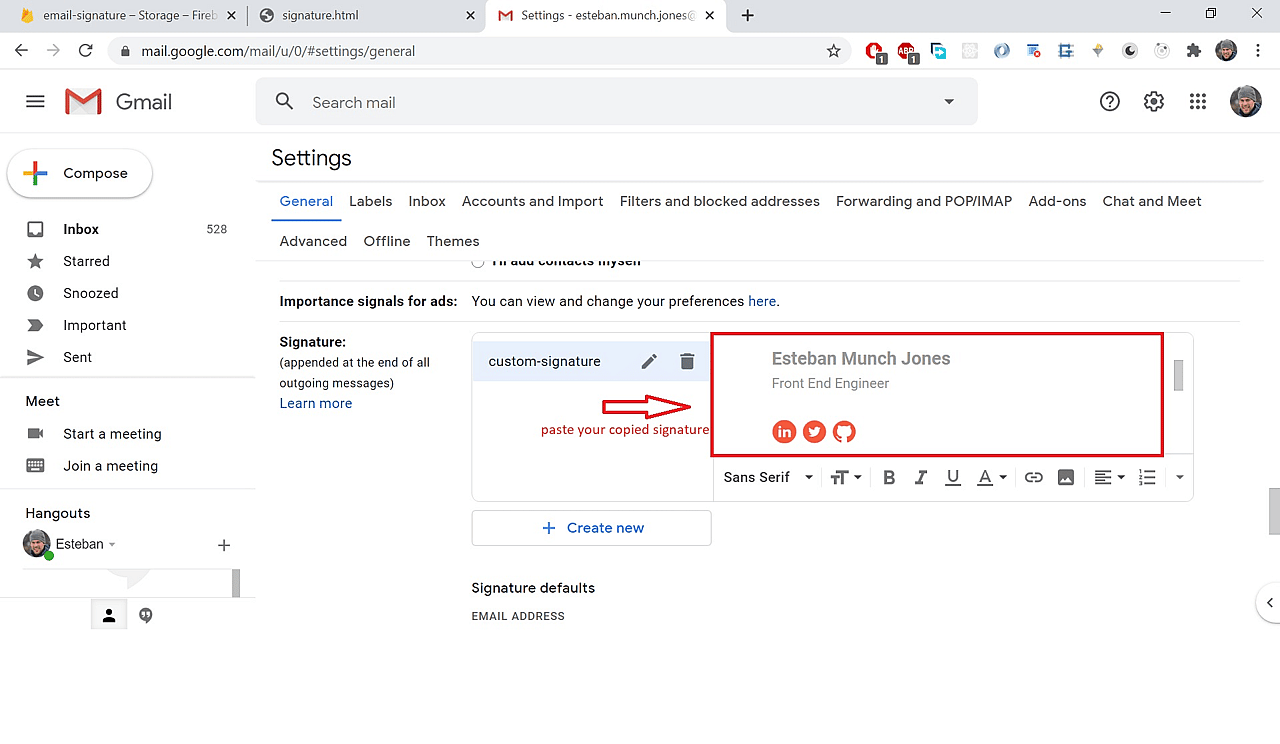
- After that, you should paste your copied signature in the text box.
- Let's make a tiny adjustment on the phone number, email and website, by deactivating the bold option, if they got bold when you pasted them:
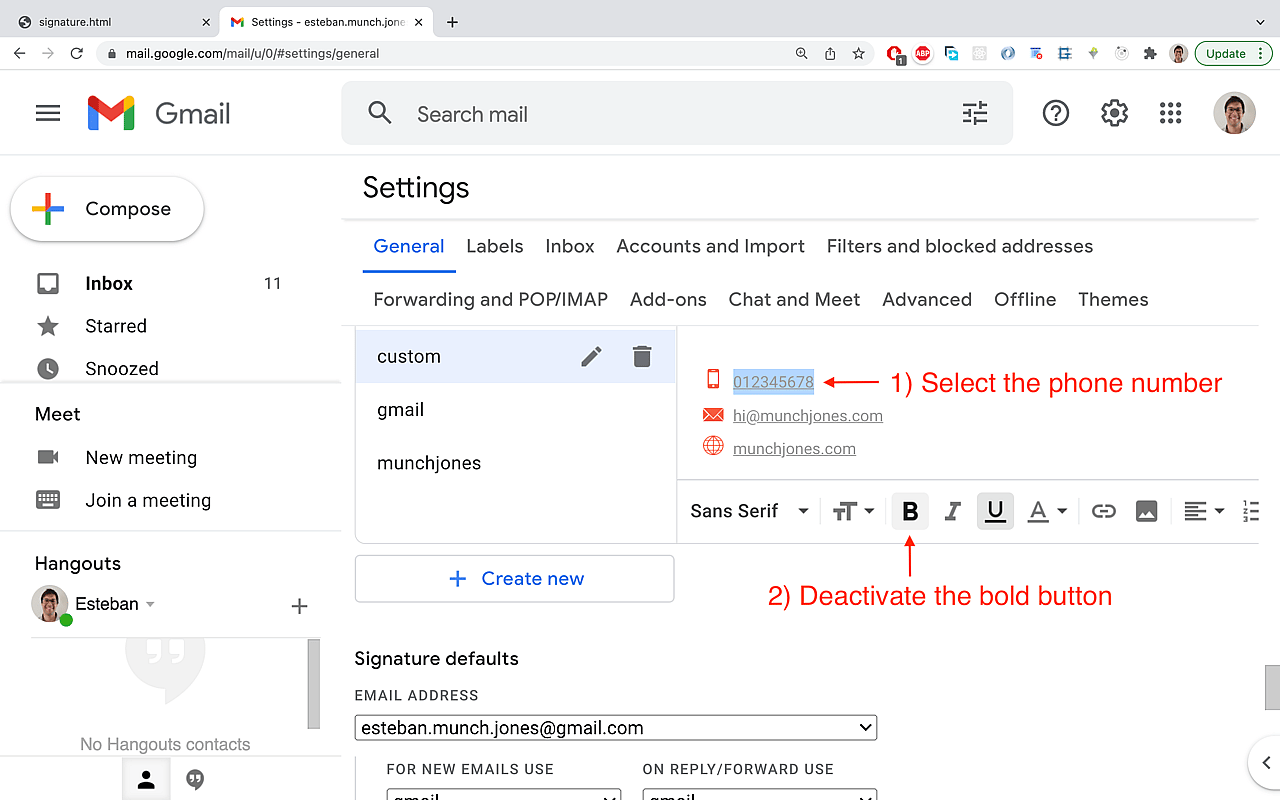
Repeat the step above for the email and website.
- Now, just add your new signature to
new mailsandreplies(or the options you prefer):

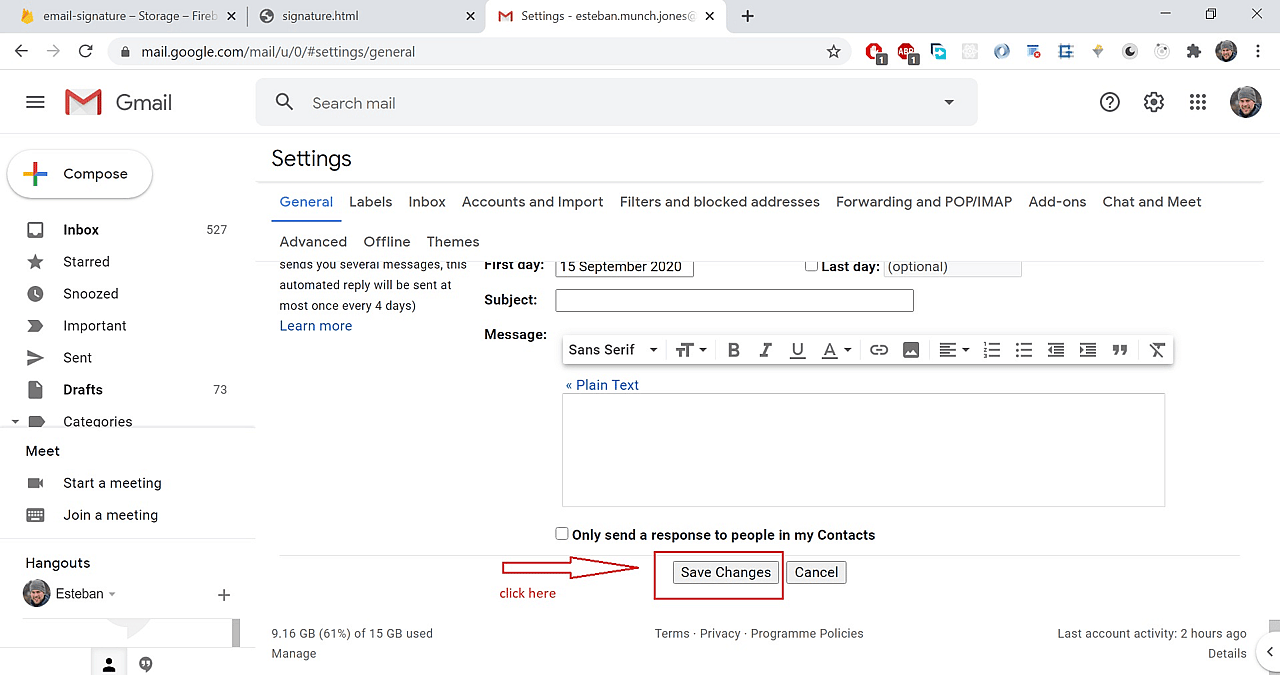
- And finally save the changes:
Let's test it now:

Wow! a modern, good looking and functional signature, thanks to HTML and CSS.